Mount S3 Bucket to Ubuntu Server

Run Script:

sudo ./s3_mount.sh <AWS Access Key ID> <AWS Secret Access Key> <S3 Bucket Name>

Script:

#!/bin/bash
####
# This script automatically mount S3 Bucket
#
# Author: Asuk Nath
# Date: 05/24/2018
#
#
# Exmaple:
# sudo ./s3_mount.sh <AWS Access Key ID> <AWS Secret Access Key> <S3 Bucket Name>
###
echo "Please wait. Downloading dependencies....."

sudo apt-get -y install build-essential git libfuse-dev libcurl4-openssl-dev libxml2-dev mime-support automake libtool
sudo apt-get -y install pkg-config libssl-dev
sudo git clone https://github.com/s3fs-fuse/s3fs-fuse

cd s3fs-fuse/

sudo ./autogen.sh
sudo ./configure --prefix=/usr --with-openssl
sudo make && make install

## Create a file with AWS Access Key ID and AWS Secret Access Key
## <AWS Access Key ID>:<AWS Secret Access Key>
## ADFDFINSDLFIKLASFJID:KDIzeri5dfjlsflkfidifd34sdfkld390jdfjDFIJ

echo "Creating password file"

cd ~/
sudo touch .passwd-s3fs
sudo echo $1:$2 > .passwd-s3fs
sudo chmod 600 .passwd-s3fs

## Create a cache folder and apply permission.
sudo mkdir /tmp/cache 
sudo chmod 777 /tmp/cache

## Create a folder to use for mount path 
sudo mkdir /mnt/s3bucket

echo "Mounting bucket"
echo "-------------------"
sudo s3fs -o use_cache=/tmp/cache $3 /mnt/s3bucket

Bucket will be mount to /mnt/s3bucket. (Modify Script to change mount folder name)

If  you want S3 bucket to be mounted automatically after each reboot.
xxxxxx  = S3 bucket name
s3fs#xxxxxx /mnt/s3bucket fuse allow_other,use_cache=/tmp/cache 0 0


Proxmox – Delete Disk Image on ZFS storage

Get the list of ZFS Disk Images

root@pve13:/# zfs list

NAME                           USED  AVAIL  REFER  MOUNTPOINT
rpool                          167G  1.39T   175K  /rpool
rpool/ROOT                    1.48G  1.39T   162K  /rpool/ROOT
rpool/ROOT/pve-1              1.48G  1.39T  1.48G  /
rpool/data                     156G  1.39T   162K  /rpool/data
rpool/data/subvol-125-disk-1   578M  19.4G   578M  /rpool/data/subvol-125-disk-1
rpool/data/vm-102-disk-1      3.07G  1.39T  3.07G  -
rpool/data/vm-105-disk-1      2.77G  1.39T  2.77G  -
rpool/data/vm-106-disk-1      17.4G  1.39T  17.4G  -
rpool/data/vm-109-disk-1      11.2G  1.39T  11.2G  -
rpool/data/vm-112-disk-1      37.7G  1.39T  37.7G  -
rpool/data/vm-114-disk-1      66.2G  1.39T  66.2G  -
rpool/data/vm-118-disk-1      6.72G  1.39T  6.72G  -
rpool/data/vm-120-disk-1       253M  1.39T   253M  -
rpool/data/vm-128-disk-1      2.30G  1.39T  2.30G  -
rpool/data/vm-140-disk-1      8.35G  1.39T  8.35G  -
rpool/swap                    8.50G  1.40T  3.92G  -

Going to delete  vm-104-disk-1

Use following command to delete Disk

zfs destroy -f rpool/data/vm-104-disk-1


Mikrotik DDoS Protection

Use Terminal

/ip firewall filter 
add chain=forward protocol=tcp tcp-flags=syn connection-state=new action=jump jump-target=SYN-Protect comment="SYN Flood protect" disabled=yes
add chain=SYN-Protect protocol=tcp tcp-flags=syn limit=400,5 connection-state=new action=accept comment="" disabled=no
add chain=SYN-Protect protocol=tcp tcp-flags=syn connection-state=new action=drop comment="" disabled=no


Mikrotik Router SYN Flood Protection

Use terminal

/ip firewall filter 
add chain=forward protocol=tcp tcp-flags=syn connection-state=new action=jump jump-target=SYN-Protect comment="SYN Flood protect" disabled=yes
add chain=SYN-Protect protocol=tcp tcp-flags=syn limit=400,5 connection-state=new action=accept comment="" disabled=no
add chain=SYN-Protect protocol=tcp tcp-flags=syn connection-state=new action=drop comment="" disabled=no

Add Connection Tracking

For v6.x:

/ip settings set tcp-syncookies=yes

For older RouterOS versions:

/ip firewall connection tracking set tcp-syncookie=yes

HostFav’s Cloud VPS – Install Windows

To install custom Windows, you need to open a ticket and provide your Customer Windows ISO image file. HostFav will not perform installation if customer provide ISO.

Hostfav will only perform installation, if Windows ISO image is provided by HostFav.

How to install Windows 7/8/10 or Windows Server 2012/2016?

Login to HostFav’s Portal

Open noVNC

Star your VPS

HostFav will mount two DVD-ROMs

– Virtio Driver CD

– Windows ISO

Installation will start automatically.

Click on Next and the Install

Select Custom: Install Windows Only (advanced)

HostFav uses Virtio SCSI HDD Controller. At the time of installation you need to load SCSI Controller Driver.

HDD not showing click on Load Driver


Click on Browse

Select Virtio Drive (Normally D:)

Select vioscsi –> w10 — amd64 or x86

Windows Setup will detect Red Hat VirtIO controller driver.

Click Next  again Next

Windows will start installing.

After finish installation install any missing driver from VirtIO CD.


How to Kill Windows Service that Hang on “Stopping”

First find Service name

Open Windows Services from Command Prompt

C:\WINDOWS\system32>services.msc

Double click on the Service and make a note of Service Name

Open Command Prompt as an Administrator

Find process id (PID) using following command and make a not of PID

sc queryex LanmanWorkstation

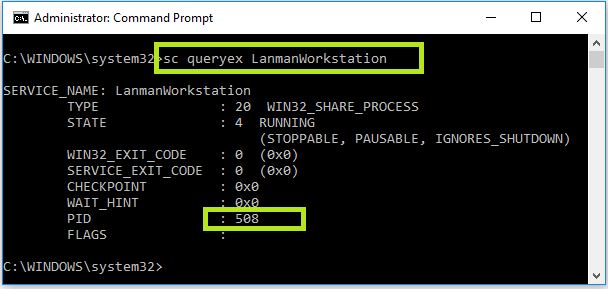
Use following command to kill process

C:\WINDOWS\system32>taskkill /PID 508 /F
SUCCESS: The process with PID 508 has been terminated.

ZFS Limit Arc Cache

1By default ZFS Arc Cache take 50% of Memory

Using following config you can limit

Create a new file

 nano /etc/modprobe.d/zfs.conf

Add following Line. 8589934592= 8GB

options zfs zfs_arc_max=8589934592

If your root file system is ZFS you must update your initramfs every time this value changes:

Use following command to update

update-initramfs -u

Reboot System

Check new limit using following command

# cat /sys/module/zfs/parameters/zfs_arc_max
8589934592

Extend Linux VM’s Drive (Proxmox, VMware and Others)

In this example we are going to add a new disk 5GB and extend root (/) partition partition.

Edit VM and add new 5GB Drive. New drive /dev/vdc has been added.

fdisk -l

Disk /dev/vdc: 5368 MB, 5368709120 bytes, 10485760 sectors
 Units = sectors of 1 * 512 = 512 bytes
 Sector size (logical/physical): 512 bytes / 512 bytes
 I/O size (minimum/optimal): 512 bytes / 512 bytes

Use fdisk utility to partition new disk

fdisk /dev/vdc
 n --> New Partition
 p --> Primary 
 Enter --> Default Partition Number
 Enter --> Default First Sector
 Enter --> Default Last Sector
 w --> Save Partition Table

Create a physical volume using newly created partition

[root@10431 ~]# pvcreate /dev/vdc1
 Physical volume "/dev/vdc1" successfully created.

First check the volume groups name

[root@10431 ~]# vgs
 VG #PV #LV #SN Attr VSize VFree
 cl 2 2 0 wz--n- 68.99g 1020.00m

He here cl is Volume Group’s Name

Extend Volume Group

[root@10431 ~]# vgextend cl /dev/vdc1
 Volume group "cl" successfully extended

Get Logical Volume Name

[root@10431 ~]# df -h
Filesystem Size Used Avail Use% Mounted on
/dev/mapper/cl-root 66G 11G 56G 17%
devtmpfs 7.8G 0 7.8G 0% /dev
tmpfs 7.8G 0 7.8G 0% /dev/shm
tmpfs 7.8G 8.4M 7.8G 1% /run
tmpfs 7.8G 0 7.8G 0% /sys/fs/cgroup
/dev/vda1 1014M 231M 784M 23% /boot
tmpfs 1.6G 0 1.6G 0% /run/user/0

/dev/mapper/cl-root

Extend the logical volume

[root@10431 ~]# lvextend -l +100%FREE /dev/mapper/cl-root
 Size of logical volume cl/root changed from <66.00 GiB (16895 extents) to <71.99 GiB (18429 extents).
 Logical volume cl/root successfully resized.

Finally Resized
In Centos 7 default filesystem is xfs.
xfs file system supports only extend not reduce. So if you want to resize the filesystem use xfs_growfs rather than resize2fs.

[root@10431 ~]# xfs_growfs /dev/mapper/cl-root
meta-data=/dev/mapper/cl-root isize=512 agcount=16, agsize=1113856 blks
 = sectsz=512 attr=2, projid32bit=1
 = crc=1 finobt=0 spinodes=0
data = bsize=4096 blocks=17300480, imaxpct=25
 = sunit=0 swidth=0 blks
naming =version 2 bsize=4096 ascii-ci=0 ftype=1
log =internal bsize=4096 blocks=2560, version=2
 = sectsz=512 sunit=0 blks, lazy-count=1
realtime =none extsz=4096 blocks=0, rtextents=0
data blocks changed from 17300480 to 18871296

Note: For ext4 filesystem use

resize2fs /dev/mapper/cl-root

Check new size

[root@10431 ~]# df -h
Filesystem Size Used Avail Use% Mounted on
/dev/mapper/cl-root 72G 11G 62G 15%
devtmpfs 7.8G 0 7.8G 0% /dev
tmpfs 7.8G 0 7.8G 0% /dev/shm
tmpfs 7.8G 8.4M 7.8G 1% /run
tmpfs 7.8G 0 7.8G 0% /sys/fs/cgroup
/dev/vda1 1014M 231M 784M 23% /boot
tmpfs 1.6G 0 1.6G 0% /run/user/0

New size changed from 56G to 62G


Proxmox VE noVNC SSL Issue

kvm: -vnc unix:/var/run/qemu-server/105.vnc,x509,password: Failed to start VNC server: Unable to access credentials /etc/pve/local/pve-ssl.pem: No such file or directory
TASK ERROR: start failed: command ‘/usr/bin/kvm -id 105 -chardev……

Revert to default SSL configuration

rm -rf /etc/pve/pve-root-ca.pem
rm -rf /etc/pve/priv/pve-root-ca.key
rm -rf /etc/pve/nodes/pve01/pve-ssl.pem
rm -rf /etc/pve/nodes/pve01/pve-ssl.key
rm /etc/pve/pve-root-ca.pem /etc/pve/priv/pve-root-ca.key

pvecm updatecerts -f
systemctl restart pveproxy